Saturday, December 28, 2013

Thank You Cards

I needed help one Sunday for someone to direct the choir and lead the music. These are the cars I gave to the people who helped out. 

I used an EK music note border punch here and saved the punches I cut out to decorate the paper. The paper was from bargains I got at Tuesday Morning quite a while ago. The "thanks" was cut with a Sizzix die. 


This is done with Stampin Up paper and stamps. The ribbon is some bargain ribbon I got someplace.

Christmas cards from class

Here are more of the cards we did in card class.

This is a Stampin Up stamp. It was embossed with with cooper embossing powder. Then colored with inks. The background was embossed. 

This was a image I got off the internet. Not sure where I got it though. Sorry I can't give the right person credit. I colored with with markers.  I used an SU punch on each side of the white stripe to look like a ribbon behind. 

Wooden sign Christmas Gift


Here is a project I did this Christmas for my son and daughter-in-law. Had a local business cut the vinyl.  Cut the wood, stained/painted it and applied the vinyl.

Elf Card Holder

I am so far behind on posts but I don't want to skip. I won't be in order but there will probably be a lot of posts this week while I am off work.

I did these punch art elves.  The head is the SU Ornament punch, Ears are the wings of the SU bird punch, The band on the hat is the SU decorative strip. The circles for eyes and nose are from the SU owl punch. Then there is the red square. 

 And then we made these boxes that how about 3 cards even if they have some 3D embellishments. Made the box with the envelope punch. I don't remember the measurements but will come back and add them later. 
I also did this card for a friend to give her daughter for when the Christmas Elf left on Christmas Eve. 

Just and adorable elf.  I supplied materials for Farmers Insurance to make cards for the local Veteran's Home. We used more of these elves on some of these cards as well. 

Sunday, November 10, 2013

Free Nativity card for Midnight madness

This was an image from Craftuprint I sized it down to fit on a 4.25 by 5.5. Can't really see all the layers in the picture. Just cute and fun!

Cards from midnight madeness

We had 5 cards from midnight madness. Well, really 6 because I offered a sixth card free to everyone. I misplaced on of the cards.  (A thank you card)  
Here was a flip card I designed especially for my friend Debbie. I used a Sizzix Die to cut the base card and A Sizzix die for the layers. 


This one was very easy. Just provided a pad of beautiful paper and the Stampin Up punch. And a stamp for the Merry Christmas

 This one was done with a Tim Holtz die and and embossing folder. Simple and beautiful.

 This one is also done with Tim Holtz die. The rosettes were done with the die. Add pretty paper from Tuesday Morning, and you have a lovely card. 

The free card will be posted separately.  

Friday, November 8, 2013

MIdnight Madness

Midnight Madness is a huge event sponsored by the woman's group at my church. My friend Shauna and I have been in charge of it for several years.  Lots of people come and have dinner, then work on projects til midnight. Here are pictures from our event in Oct.

This is one of the almost hundred little loaves of bread I made for each woman who attended.  We served it with several kinds of soup for dinner. 


Each loaf was wrapped with the words. "You are Loved" on a tag.  President Thomas Monson gave a talk recently about a woman who received a loaf of bread which was a symbol of God's love for her. We wanted to share that love with the group.
Here are some of the people who attended hard at work
 Here is one of our wood projects. 
 And this is the other. On this one, you can flip the board on the bottom and the Christ picture to make it usable all year round. The other side of the bottom say Lead me, Guide me, Walk beside me.
 There were several candy bar wrappers.  I think this was a favorite. 
 This was so so cute, that my friend Maria redesigned the wood project to look like it. 
 How about these cute mummies done with strips of white cardstock inked a bit with distress ink. 
These were done with an image I got at craftsuprint.com It was designed for a card but fit perfect on the candy bar. The penguin is in paper tole, (layered).

 Here is another converted project from craftsuprint.com. 
 Here are some friends at the card making table. I will share the cards later. 
 We had a table for "Don't pin it, Do it" 
 My friend Maria did this cute ghouls sign. 
 This was a great idea I got at my son's wedding. Just hot glue a plate and candle stick for fancy layered trays. Then just get soak it in wash water and they come apart. Easy to store and create different size layers. 
 We did glass etching on dishes. Great gift and great way to get your dish back after a potluck. 

 Here is the final one for this post. It was a metal welcome sign. Layered vinyl. Beautiful and simple. 


Saturday, October 12, 2013

Sketch Journal for Paul

Paul asked for a journal to sketch in and I sent this. I decorated it first. I as kind of proud of it.
Sketch side has a different design. He is serving a mission in Washington DC.

This is the other side. Hope he likes this. 

Card Class again: Halloween, Thanksgiving, Christmas

So I continue to be behind but here are cards from a recent card class.  The theme was the holidays of Halloween, Thanksgiving, and Christmas.

This features some of my treasures from Tuesday Morning,  The die for the pumpkin is a Tim Holtz die.  I am not sure who did the paper. I got it along with the die from Tuesday Morning. 
Inside we did a spider. 
It ran along the side  inside. 

For Thanksgiving,  I did this one. 

 I was a digital image I edited and printed on three colors. Then I had the class add highlights with markers. 
We punched leaves on the inside with an EK punch. 

Finally Christmas!

The trees are on a single stamp. They are from an old Stampin Up set. I embossed them in silver. 


Saturday, September 14, 2013

More pop ups from class

This card was cheating a little. I had a lot of card parts left over from the mother daughter activity on Wednesday so I just added a pop up inside. 

The front is a Stampin Up die called top note. The thank you is also from Stampin Up. The flower is a Sizzix die, I just had a pile of card bases. A pile of top note die cut pieces and a container of flower parts. Everyone could do their own thing. 

 Inside we used a Pop n Cut die by Sizzix. I think I love these. I don't have a base for it besides my Tim Holtz base so I did my own thing. The flowers were cut with an EK punch.
 The front on this card was done with a Stampin Up stamp and punch. The embossing die was from Sizzix.

The inside pop up is a Pop N Cut die sold by Stampin up. The additional dress and floor stand is also from Stampin Up The Happy Birthday is cut with a die from Paper Wishes.

Thanks for popping in

Pop Up card class - card one

I just love pop up cards and so the theme for card class this week was pop up cards.  The class had to work extra hard this week since it was like doing two cards for every one card ( one inside and one outside).

I didn't get pictures until almost the end and most people had left. 
Card one was the simplest and shows you almost any image can be made into a pop up. Just create a box inside your card. The bigger the box the further out into the card your pop up is. Here a used a 1 x 4.5 strip and scored it at 1, 2, 3, and 4 inches. Over lap the 1/2 inch piece.  I put adhesive on two sides of the block and attached at to the card on each side of the fold. 
This was another package of paper from Tuesday Morning.  I typed the words on the computer and printed them on card stock


Inside is the pop up. A dragon! He is colored with colored pencils and blended with odorless mineral spirits. The words on the card say : A little bird told me - you were Drag'n

Here is a closeup of the box that creates the pop up.  

I think I will post the other two cards on separate posts. Thanks you for stopping by. 

Tuesday, September 10, 2013

What I have been up to...

This isn't like any of my posts ever before. I was busy making playdough tonight.  Yep, playdough.  I have been a crazy crafter lately. Just responsible for a ton of things in the near future. There is a mother -daughter picnic tomorrow and I am supplying a bunch of items.
1. Supplies for about 40 cards
2. stuff for the little girls to do bracelets
3. Paper dolls for the young girls
4. 5 kinds of playdough for kids to play with and recipes for parents to take home.
4. And maybe an additional craft for the grown ups too but I am running out of time.

In addition, we have a craft night in October called Midnight madness. I had to have a bunch of samples done for that. We are revealing the crafts tomorrow. I have done the following
1. 6 different candy bar wrappers
2. A perpetual birthday calendar
3. Glass etched casserole dish ( with your name so you can get it back after potluck)
4. Vinyl personalized items.
5. 5 handmade cards

Then on Friday, I have card class. Pop up cards is the theme.  And I own 3 swaps for JustCards.

So here are the playdoughs.....

The red one is Jello Playdough
The yellow/ orange is Kool-aid Playdough
The blue is just plain homemade playdough colored with food coloring. 
If you need recipe, leave me a comment and I will either post them here or send them to you personally.  

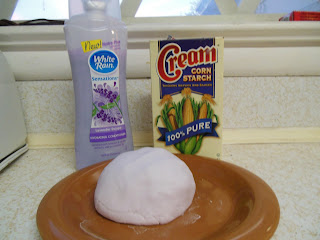
This is the weirdest one I made. No baking. Just hair conditioner and corn starch. Pretty good stuff though. 
Okay, you are right. Not really playdough here. This is Gak or Slime. My grandsons call it Boogers.  It is made with Borax, Glue, water and food coloring. 

More posts to come with more of the projects. 

Saturday, August 31, 2013

August 30 Card Class

I may never catch up with posting my cards on here but here is information from our last card class.
Here are some of the class members.  We did flip cards this time in three different ways.
If you would like the technique sheet for the class, let me know and I will email it to you. Haven't figured out how to attach it here.
Method 1: Super Simple- Find a die that cuts Flip cards. I got this one from Sizzix and the had a matching set of dies for the layers. The punch and flower emboslit is from Stampin Up.


Method Two: This is done with Nestibility dies. Here is the link for a video about it.
Measurements depend on the die you use.  The camper and words is a Unity stamp. 

Method 3 is the hardest. By hand. No dies to cut for you. 


Wish everyone could come to class!