Thursday, December 30, 2010

Cards after Cleaning

So while cleaning I found lots of images that were partly colored or even completely done and tons of scraps. I got a lot of cards done quicky and I am going to continue to try and use up some of those things.

I was really happy how her hair turned out on this one. I wish you could see it better from the picture. Part of her was colored with colored pencils blended with odorless mineral spirits. The rest was colored with Copics. The flowers are iridescent.

More cards will be posted tonight.


Monday, December 27, 2010

Organized Chaos

I have had to clean up my room after Christmas. well, it is not clean because I only showed you the edges in  my pictures. In the middle is a card table still piled high but things are looking better.

This is my cutting table with my cuttlebug, new Cricut and manual paper cutter.  The three containers with drawers underneath have paper, embossing folders, stamps, stickers, and chipboard diecuts. Most of the drawers are labeled. 2 drawers are just I Brake for Stamps stamps. I am a little crazy about them. : )  Behind the table is a closet with clothes in it. The hangers on the closet are some I got when a local store was closing.
This is m desk. So you seen my new TV on the bookshelf. The old one is sitting on the desk. I have used every inch. Two bookshelves on the desk. One with beads and jewelry supplies, the other with paper crafting supplies.  The white bit above the shelf is a window frame. I have one window in the room. My room is in the basement.

This is the other wall by my deck. You can see just a tiny bit of the open door on the left hand side of the picture. The bookshelf has my Stampin Up stamps. The black "gutter" is my ribbon holder but it is starting to overflow. There are metal squares that hols magnetic containers and stuff.  
Lots of stuff everywhere.

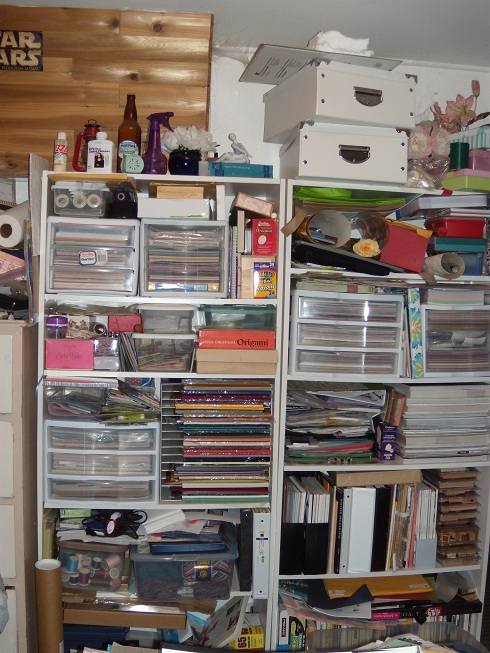
This is next to the door-behind my desk. I have things stacked up to the ceiling.
This is two shelves between the cutting table and my desk. You can see the card table at the bottom of the picture.

It is a very full room so I am going to try to be a good girl and limit my purchases while tryng to use up what I have.

Sunday, December 26, 2010

Snoopy has blog candy

My friend Snoopy has reached 30,000 hits and is offering some wonderful blog candy. Take a look and celebrate too.

http://snoopyshomemadefun.blogspot.com/2010/12/blog-candy.html

Sunday, December 19, 2010

Santa Treat holder

I needed one more different treat holder. This is shaped like the tree ones but decorated as Santa.  I saw this done on a video at http://www.youtube.com/watch?v=AvgS9_BuykE


Very easy really. I used a button for his buckle since I didn't have one of the metal once from the video. I also used distress ink to color the paper so it looked pinker. Inside I have2 mini Snickers bars.

Sunday, December 5, 2010

Big treat container

Here is another treat container I did. It is pretty big and would hold a lot more. You could loosen the ribbon on it and it would hold even more. I loved how it turned out but my pictures aren't terrific.

I got the pattern from this video:

The papers were from a AC paper selection I got from Tuesday Morning last year.  I did mine as a 9 by 9 square.  That made it easy to divide by 3.

The Merry Christmas stamp is very old and I think it was from a Stampin Up. I have had it for about 20 years.  I think this was fast and simple. Hope you will give it a try. I am going to use them for neighbor gifts this Christmas.

Happy accident

I have a standing order for two treat holders a week. I wanted to so something different so I searched the internet for ideas.  Well, I found one that looked easy.  I put on together and then went looking for a stamp to decorate it. Well, I found this stamp and it was a perfect fit. Isn't this cool!
Here is a video on how to make it.
http://www.youtube.com/watch?v=k5g4R4OzwTw&feature=player_embedded

It is soo easy. The stamp I used is by Outline Stamps.  I colored it with copics. I filled it with a couple mini Snickers bars.

Sunday, November 28, 2010

Links and a offer

There have been lots of comments on the pop up tree on JustCards so I am reposting the links for a video about assembling the tree and another site with inspiration.

Here is the link to the video on making the pop up Christmas tree. http://melanieschulenberg.blogspot.com/2009/09/o-christmas-tree-pop-up-tutorial.html


Here is a link to someone else who did some cool things with the tree: http://www.blogger.com/goog_355538798

And here is the offer.  I will send the parts for a pop up tree to the first 10 people who leave comments here that they would like to have a tree.  It will just be the parts needed. No decorations. You can ask for a green or white tree. Your choice.  Please leave an email address for me to contact you for an address unless you are in the contact list on JustCards.

Faux Embossing

On JustCards, we had a faux embossing technique swap last month. I made the following card for the swap.

\There is a video here about the technique.  You just use punches in the same color as the background and it looks embossed but it isn't.
The stamp used is from Stampin Up. The snowflakes were done with a Cuttlebug die and embossed in a Cuttlebug folder.
Today I did another card using the technique. This time I used a new cupcake punch. I have wanted the punch for a long time and happily got it on Thanksgiving day. The stamps are from Stampin Up. I colored it with Copic markers.

Saturday, November 27, 2010

Christmas Kittens

This is one of the many images I have been given. Isn't it adorable! I colored it with Copics and used a Cuttlebug embossing folder to do the background. 

New Pop up card this year

I made another pop up Christmas tree card. There are many more that I did last year so you can check the archives if you want to see more. I did it with a die I got from Stampin Up. Iy was expensive but I love the cards I have done with it. This card is for a friend's grandchild. He has asked to pay for it but I am going to give it to him.  The front is a  hÄnglar and stÄnglar stamp. I love these even more than Magnolia but that are even harder to get. A friend in Sweden has treated me to some stamps and images.
I colored it with Copic markers.
Here is the tree. I have added several pictures so you can see it opening.


The tree has been decorated with Stickles, die cuts and punches. The die cuts were from Cuttlebug. The "balls" are punches from a regular little circle punch. I then took a white highlighter to each ball circle to give it dimension. The tree border is an EK punch.

Sunday, November 21, 2010

Even more cards

So here is the first card. Tthe image was a gift. The red and white shapes are left over from a Christmas card from last year and is done with a Spellbinders die. I colored it with Copics.
The image used below was a gift from my friend Annika. It is hÄnglar and stÄnglar stamp.  I colored it with Copics.

This one is also an image from my friend. It is a Magnolia stamp. The embossing on the background is a Cuttlebug folder. The red background shape is a Spellbinder die. The coloring is copics again

The Santa stamps are by High Hopes. The word stamp is Stampin Up. The coloring is copics and the a little colored pencil to shade the beard. I also used Diamond Sticklers to decorate the trim on his hat.


This santa is also High Hopes.  I don't remember who did the Happy Holidays words.  Coloring was done with Copics again.  The hat trim has Stickles again.
This image was another gift and is colored with copics.
This one was done with a sticker set I got at Tuesday Morning. I did the embossing on some beautiful metallic paper with a Cuttlebug folder. It is the reverse side of the background paper with the little +'s on it. I got that at Tuesday Morning too.  I used the extra little snowflakes and gems on the simple embossed Christmas trees.

Here is another image that was a gift. It is colored with copics.  The Santa is High Hopes.

This is the inside of one of the cards. It with done with an EK border bunch. I loved home it layered.

These didn't sell too well. Of all the cards I posted today, I have 5 left. Do you wonder if you will get one for Christmas?


Christmas card

Now it is time to show you some of the Christmas cards I did : ) The first two are cards made with the pretty paper I mentioned that matches the dollar store chipboard pieces I got.


Next are two simple embossed cards. I needed cards to sell at the craft show and was terribly sick. I decided I needed some simple cards. The embossing folders are from Cuttlebug.
I added some stickers to this last one.

Something else-Jewelry

So I have had a lot of posts on my treat containers. I also did some jewelry. I don't like how my pictures of the jewelry turn out but this one turned out nice. This one did not sell at the craft show but I like it and am happy to keep it.  They are simple pieces but I like it.

Treat holders with chipboard

I guess I didn't take many pictures of many of these. I found a box of Christmas chipboards at the dollar store and just happen to have perfectly matching paper. I also found some other chipboard images that I had from last year.

The joy tag is a chipboard one.  The other one is a sticker one.  Below is one of the ones I did with Chipoard I had left from last year.
Cute little elf!

Even more treat holders

See, I told you I made lots of different ones. The ones posted here were done with stickers. The words are peel off I got from England as a gift


I thought the paper matched perfectly. I was so happy that I had paper that matched.

High Hopes Christmas Treat

Here are a couple of the treats I did. I used a High Hopes stamps for the Santas. I used copice to color them and stickles to add glitter to his trim.

Saturday, November 20, 2010

More treat holders

These are some of the other Thanksgiving ones I did.  These are like the Halloween ones I did. They have M&Ms, Skittles or Reeses in them. 

Treat holder

I have made a ton of treat holders. I sold many of them at a craft sale at work. The containers here are done with a kit by K&Company. I will do several posts with them. I didn't get pictures of them all.


I saved a couple to use as patterns in the future.

Monday, October 25, 2010

E is for Elephant and Explore

The alphabet swaps continue at JustCards . This is my E card. It is very different than my usual stuff. I was inspired by a pad of paper I had.

Sunday, October 24, 2010

Christmas at class

Here is the third and last card we did at class.  It was a Christmas card and I wanted to show the technique where you use plastic wrap to adhere the napkin to cardstock.  Here is the ink to the video I say the technique on.
http://www.youtube.com/watch?v=9hpqpeljWd4&feature=related

After the picture was taken, I added a bit more glitter dots to make it look like snow.
The stamp is from Stampin Up. I cut out the snowflake with a cuttlebug die

Saturday, October 23, 2010

Thanksgiving at class

The next card we did in my class was a Thank You card for Thanksgiving. 

I got this lovely paper on clearance. It is double sided. You are seeing both sides here.
The bird is punched out with a punch made by Stampin Up.

Halloween at card class

I do a card class in my home once and a while. We did one last night and I designed the cards yesterday afternoon. I was very happy how they turned out doing it so fast.

Here is the Halloween card. My next two posts will have the Thank you card for Thanksgiving and a Christmas card.

The background crackle, I got from I Brake for Stamps
I used a cuttlebug holder for the spider web.
I printed the words :Hope your Halloween is ....
I colored the image with copics.


In side is a pop tree by Sizzix and a pumpkin doe with a cutter and embossing folder from Cuttlebug. I printed the words Spook-tacular


Pop up cards are such fun!!!