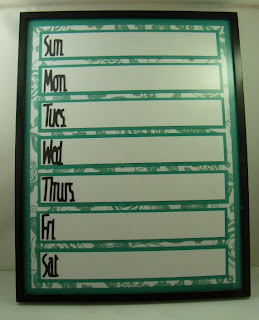
This was an easy project. I had cut out lots of different colors so people could pick something to match their kitchens. You write the menu with a dry erase maker. I cut out the days of the week with my Cricut.
It is in a 8 1/2 by 11 frame.
Tuesday, November 6, 2012
Sunday, November 4, 2012
5 cards at Midnight Madness
Another paper craft I created for midnight madness was 5 Easy Christmas cards. Here they are
This one is pretty music paper, a Stampin Up stamp, and a EK ornament punch
This one is pretty paper, an EK punch and a stamp from I Brake For Stamps. The stamp is called Manger. It is available as a digital stamp and a rubber stamp.
This is done with pretty paper and Tim Holtz dies. The words some out and are interchangeable.
This one is just pretty paper again and the words are from Stampin Up
This one is done with a die I got at I Brake for Stamps. The background is done with s Sizzix folder that I got at JoAnn Fabrics. It is colored with markers and blender pens/inks.
Hope they give you ideas.
Family Frame
This was the most popular project at Midnight Madness this year. I saw something like it on Pinterest but them developed my own thing because nothing had directions and most were restricted to Stampin Up supplies.
I cut out most of the pieces for 53 of these. CRAZY!! I cut everything but the vines and bird punch for 53!! Well, I think everyone loved it which is really nice. Sadly, I will probably have to cut one more for my daughter for Christmas.
This is a 8 1/2 by 11 frame. The red paper is Cherry Cobbler from Stampin Up. The rest is just papers I found. The paper behind the "I" is a plain paper with the red design stamped.
- Background paper is 81/2 by 11
- Black squares are 2 1/2 by 2 1/2
- patterned paper squares are 2 1/4 by 2 1/4
- The letters were cut with the Classic Font Cricut cartridge.
- The little vines are separate from the letters and done with the pieces from an EK vine border punch
- The bird and butterflies are done with Stampin Up products. Punch for the bird and embosslet for the butterflies.
- Other shapes are dies by Spellbinders.
- The "Together Forever" stamp is Stampin Up
I cut out most of the pieces for 53 of these. CRAZY!! I cut everything but the vines and bird punch for 53!! Well, I think everyone loved it which is really nice. Sadly, I will probably have to cut one more for my daughter for Christmas.
Finished Advent Calender
This is another Midnight Madness project. I think people who choose to do it, didn't believe me when I said it was very time consuming. They believe me now.
Website is HERE that has the instructions
I did a more Christ centered version and included a scripture in each mini box. Look at past posts for a close-up of it opened. The stamp was gotten from I brake for Stamps.
Website is HERE that has the instructions
I did a more Christ centered version and included a scripture in each mini box. Look at past posts for a close-up of it opened. The stamp was gotten from I brake for Stamps.
Midnight Madness
The woman's organization at my church has a special meeting once of year. We have dinner and a bunch of crafts. It runs from 6 to midnight and is a bit of madness. This year we also had a presentation on preparedness since 60 homes were lost in a fire here this year. I was in charge of a lot of the activities. I did the sample for most of the crafts and was in charge of almost all the paper crafts. Here are the wood crafts I did samples of and my friend Maria took charge of cutting wood and helping people that night.
.
I got this idea from Pinterest. Here is the BLOG She did not give sizes.. I did it at six and seven inches with the heads of Mary and Joseph being 1 1/2 inch balls. Baby Jesus was 1 inch. I used a brown wash on Joseph and blue was on Mary.
This was also a project from Pinterest. Here is the BLOG. I added more feathers than the original. The feathers are Jumbo craft sticks covered with scrapbook paper. The square is a 3 1/2 in square of 2 by 4. The head is the end of a paint stick for a 5 gal paint container. The beak and waddle are paper and the eyes were done with black paint and a Q-tip. The base paint was brown.
I have additional project that I will post in separate posts.
Subscribe to:
Comments (Atom)


