Saturday, October 31, 2009

Pop Up O Christmas Tree

When I first saw this die, I just had to have it. I actually had to take some cards, bookmarks and jewelry to work to sell, in order to be able to afford it. It is NOT cheap. Today I had three friends come over to help me figure out how the tree worked. I am so pleased.  Thanks for checking it out!


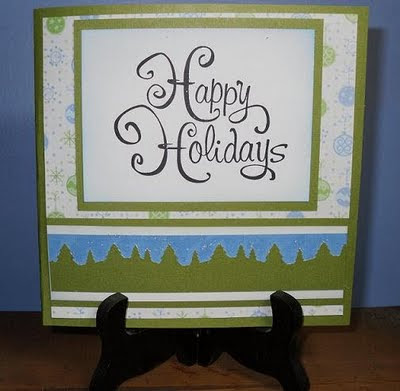
This is the front of the card. The word stamp is from Inkadinkado. I got it at Tuesday Morning for just $.99.  The tree border was done with a EK punch. I chose the colors from some Christmas papers I had from last year as part of one of those ultimate scrapbook sets.


Here is the card open. It is so cool that I can do such a complicated pop up card.  The tree skirt was done with a Outline Stamp. I colored it with colored pencils but the paper itself was also printed. This was part fo the same ultimate scrapbook set.


This is a close-up of the corner designed for the sender to leave a message. The curls are bits of left over paper from the flourish die cuts I used on the tree.  Just couldn't trow them out and I like the detail.  The snowflales were a punch. I have had it a long time and don't know who makes it.


The tree is decorated with punched circles, tiny stars that are part of a border punch, and flourishes. The flourish die is from Quickutz. The "snow" is a Stickler. I used a little of that on the front of the card above the trees.

I did watch this viseo to help me figure out putting the die cuts together. You can see it here.  I also got some inspiration at I Am Not Left Handed. You should check out her pop up cards.  Thanks for stoping by!Let me know what you think,

Weekly Color Game


On JustCards, we are playing a color game from now until Christmas. If you are not a member of JustCards, please come and join us.  The way the game works is that I have picked over a hundred colors off of a wikipedia site.  Each Sunday, I will post 5 colors drawn at random on JustCards. THe game is to make a card using at least three of the 5 colors.  I will have different judges each week pick one. That card will be put on the group homepage for the week and I will send them a little prize like unmounted stamps, diecuts or images

This week, the colors chosen were sienna, wheat, plum, cerise, and periwinkle. I chose seinna, wheat and plum. This is my card.  The stamps are from an old Stampin Up set.

Sunset Moose Cards


I made two cards like this this week. The sunset is done with alcohol inks on glossy paper by The Paper Temptress. The stamp is from a set of unmounted Alaska stamps. I was never told who made them. I got them off of ebay a couple years ago. The leaf paper in the background is from K & Company. The beige leaves are tectured and very cool. I hated to cover them up but it really ehlped complete the cards.

Monday, October 26, 2009

Bear Cards


I finished up these two bear cards tonight. I did the coloring on the bears over the weekend. They have been colored with Copic markers.


The background was done with Vintage Photo Distress inks.  I just kind of lightly rubed the pad over the paper.  I don't know who made the bead stamps. They are from an Alaska set I got from ebay that didn't tell who made them. 


The word stamps are from Stampin Up. I have two more images ready to use on a card. I hope to get those done tomorrow.

Masculine Cards


I think cards for men are the very hardest. They also take a lot more time than other cards. Well, I have had requests at work for manly cards so I am trying to get a few done this week. Here is one I did this weekend. The car is from I Brake for Stamps.  The word is from Stampin Up. The background is aluminum foil covered card stock that I embossed with my Cuttlebug.  I did the coloring with Sharpie and Close to My Heart markers. The rivets in the corners are the final touch.

Monday, October 19, 2009

Beach Dreams


It is getting cold here. Autumn is in full blow and winter is nipping at our toes.  I dream of time on a beach somewhere. The warm sun pouring down.
Pam Peake sent me this image as a gift during an image swap on JustCards.  The stamp is designed by D. Morgan. Stamps Happen is the manufacturer. I colored it with colored pencils and OMS.  THe background stamps are the shells you have seen often in my work. They are from I Brake for Stamps. They are my all time favorite stamps!  They are stamped and shaded with Vintage Photo Distress Ink.
Hope everyone stays warm!

Thursday, October 15, 2009

Soot Technique Swap


This was fun. I am really glad I tried the technique. You hold a glossy paper over a candle right in the flame. After it is covered in soot, stamp it with a plain rubber stamp.  Then spray it with a sealer, I liked Crystal Clear. 
The pumpkins were part of the same stamp used on my Fall card. The stamp is from I Brake for Stamps. I colored the pumpkins with markers. The Tree is from Rubber Stampede called Tree Frame

This is the inside of the card. The Happy Halloween is from Martha Stewart. The pumpkin saying is from Ann-ticipations.  I used my favorite distress ink, Vintage Photo to shade.

Tuesday, October 13, 2009

T is for Teacup and Tilda


It is time again for an alphabet swap on JustCards yahoo group.This is my T card. T is for TIlda and Teacup.  It turned out so cute! The cup is from a bunch of bargin stamps I got locally. It is called China Tea Cup by Stampedous. The words and background are from Stampin Up. The rest of the them are from Magnolia. They are part of the Fall Stamp Club.

Most of the coloring was done with Copic markers. The blue was a BIC marker since I didn't have the right color in Copics. The background was done with Stampin Up ink.The final touch was white pearlescent water color used on the dish and cup to look more llike china.


Sunday, October 4, 2009

Big blog candy


Chris Olsen has some major blog candy. If you are interested in entering, her blog is at /http://twinklesglow-glowbug.blogspot.com/.  Looks lile a lot of fun and there is some great work there too.


Soot Technique


I did two cards tonight. I tried the soot technique. I learned it from Gina's site.

I am not showing one of the cards because I am sending it for a swap. This is the second card I did. The technique is easier than I expected it to be.


Here are the basics:

Supplies needed:
A rubber stamp, a candle, glossy paper and some kind of sealer.

1. Light candle
2. Run the glossy side through the flame. I was surprised how far into the flame I had to run the paper through. Just don't catch it on fire!
3. Once you like the amount out soot, stamp the image. No ink needed. Be careful because your fingers will take off the ink as well.
4. Seal the image. I used Crystal Clear sealer but you can even use hairspray. If you don't the soot will come right off. You can even kind of "erase" the paper by wiping it off and starting over

I was thinking kind of vintage prom when I did it. The dress stamp is from Inkadinkado by Dawn Houser. I have seen it called Mom's Dress. The camera is from Stampin Up. It is part of a set called Travel Post.